Difference between revisions of "Running OscilloscopeRF on the Imote2"
| (3 intermediate revisions by the same user not shown) | |||
| Line 5: | Line 5: | ||
The Imote2 accelerometer readings are signed 16-bit integers. This differs from Mica2, MicaZ, and TelosB motes, which provide unsigned 16-bit integers. To display these measurements correctly, GraphPanel.java is modified to convert the readings into signed integers (see lines 250-251 of GraphPanel.java). | The Imote2 accelerometer readings are signed 16-bit integers. This differs from Mica2, MicaZ, and TelosB motes, which provide unsigned 16-bit integers. To display these measurements correctly, GraphPanel.java is modified to convert the readings into signed integers (see lines 250-251 of GraphPanel.java). | ||
| − | The instructions below assume that you have TinyOS-1.x on a Windows XP PC with the Imote2 extensions. If you do not or are not sure, follow these instructions. | + | The instructions below assume that you have TinyOS-1.x on a Windows XP PC with the Imote2 extensions. If you do not or are not sure, follow [http://sensorweb.vancouver.wsu.edu/wiki/index.php/Tinyos#Install_Imote2_in_tinyos-1.x these] instructions. |
== Running the Demo == | == Running the Demo == | ||
=== Download the Source Code === | === Download the Source Code === | ||
| − | Download the source file and extract the tar archive into tinyos-1.x/apps. The files will be extracted into subdirectory OscilloscopeRF_Imote2. | + | [[media:OscilloscopeRF_Imote2.tgz|Download]] the source file and extract the tar archive into tinyos-1.x/apps. The files will be extracted into subdirectory OscilloscopeRF_Imote2. |
=== Compile the Source Code === | === Compile the Source Code === | ||
| Line 122: | Line 122: | ||
<pre> | <pre> | ||
cd /opt/tinyos-1.x/apps/OscilloscopeRF_Imote2/java | cd /opt/tinyos-1.x/apps/OscilloscopeRF_Imote2/java | ||
| − | java net.tinyos.sf.SerialForwarder -comm serial@ | + | java net.tinyos.sf.SerialForwarder -comm serial@COM35:115200 & |
java oscope.oscilloscope | java oscope.oscilloscope | ||
</pre> | </pre> | ||
| − | Replace " | + | Replace "COM35" with the port that the Imote2 is connected to on your PC. |
Note that it is important to launch the Java application from within /opt/tinyos-1.x/apps/OscilloscopeRF_Imote2/java because this directory contains a platform.properties, which tells the SerialForwarder to use the MicaZ platform, which is compatible with the Imote2. | Note that it is important to launch the Java application from within /opt/tinyos-1.x/apps/OscilloscopeRF_Imote2/java because this directory contains a platform.properties, which tells the SerialForwarder to use the MicaZ platform, which is compatible with the Imote2. | ||
Latest revision as of 21:39, 30 April 2008
The Imote2 comes with a different set of TinyOS sensor components. As such, the original OscilloscopeRF that comes with TinyOS-1.x cannot run on the Imote2. This demo shows how OscilloscopeRF can be modified to work on Imote2s.
The sensor component used in this demo is BasicSensorboardAccelDataC, which is located in tinyos-1.x/contrib/imote2/tos/sensorboards/BasicSensorboard. While this component is intended to be used as part of Imote2's driver framework (see this posting on the Imote2 Yahoo group), using it directly is sufficient for this demo.
The Imote2 accelerometer readings are signed 16-bit integers. This differs from Mica2, MicaZ, and TelosB motes, which provide unsigned 16-bit integers. To display these measurements correctly, GraphPanel.java is modified to convert the readings into signed integers (see lines 250-251 of GraphPanel.java).
The instructions below assume that you have TinyOS-1.x on a Windows XP PC with the Imote2 extensions. If you do not or are not sure, follow these instructions.
Contents
Running the Demo
Download the Source Code
Download the source file and extract the tar archive into tinyos-1.x/apps. The files will be extracted into subdirectory OscilloscopeRF_Imote2.
Compile the Source Code
Compile the application for the Imote2 platform:
cd /opt/tinyos-1.x/apps/OscilloscopeRF_Imote2
make imote2 debug
If you get error:
cc1: /cygdrive/e/wasabi_drops/wasabi031117/install031117/include: No medium found
cc1: /cygdrive/e/wasabi_drops/wasabi031117/install031117/lib/gcc-lib/xscale-elf/
Wasabi-3.3.1/include: No medium found
cc1: /cygdrive/e/wasabi_drops/wasabi031117/install031117/xscale-elf/sys-include:
No medium found
cc1: /cygdrive/e/wasabi_drops/wasabi031117/install031117/xscale-elf/include:
No medium found
Either put a disk into drive E, or remove the drive from your system.
If you get error:
dwarf2bd -nc build/imote2/main.exe
make: dwarf2bd: Command not found
make: *** [bin] Error 127
Ignore it.
Installing the Code on an Imote2
Attach an Imote2 via USB and use the USBBootLoader to download the application onto the mote:
USBLoaderHost -p build/imote2/main.bin.out
You should see output similar to the following:
    Program Mode, File name = build/imote2/main.bin.out
    File Size 211788
    Device detected
    Device detected
    GET_IMAGE_DETAILS Received.
    ImgSize=211788, Num Packets= 3472
    Total Packets Uploaded = 0, 0.00% completed
    Sending CRC Check command 22360
    Total Packets Uploaded = 546, 15.00% completed
    Sending CRC Check command 19048
    Total Packets Uploaded = 1092, 31.00% completed
    Sending CRC Check command 4372
    Total Packets Uploaded = 1638, 47.00% completed
    Sending CRC Check command 33305
    Total Packets Uploaded = 2184, 62.00% completed
    Sending CRC Check command 25969
    Total Packets Uploaded = 2730, 78.00% completed
    Sending CRC Check command 2043
    Total Packets Uploaded = 3276, 94.00% completed
    Sending CRC Check command 3819
    Image Download Completed
    CRC of the Image = 8374, Total Size = 211788
    Time taken for Upload 9685 Milli Seconds
    Image Verification Completed.
    Loading Image to boot location and marking it as golden.
    Time Elapsed till IMG_VERIFY 12734 Milli Seconds
    Time Elapsed 19340 Milli Seconds
    Successfully copied image to boot location.

    Mapped Boot Image to golden. Booting New Image.

    Overall Time Elapsed 22127 Milli Seconds
Disconnect the Imote2 from the PC and connect a battery pack and ITS400 sensor board to it.
Installing TOSBase on another Imote2
Attach another Imote2 to the PC and program TOSBase onto it:
cd /opt/tinyos-1.x/apps/TOSBase
make imote2 debug
USBLoaderHost -p build/imote2/main.bin.out
Attaching TOSBase to your PC
Disconnect to Imote2 with TOSBase from the PC and attach an IIB2400 interface board to it. Next, connect the USB cable from the PC to the IIB2400 interface board. Hit the reset button on the mote to turn it on. Two COM ports should show up on your computer.
Note: It is important to attached the USB cable to the IIB2400 interface board rather than directly to the mote. If you don't, the mote will NOT be connected to the computer via serial port and SerialForwarder will not recognize it.
Turning on the OscilloscopeRF Mote
Turn on the mote running OscilloscopeRF. To do this, first turn on the battery pack, then hit the mote's reset button.
At this point, the LEDs on both motes should should be blinking. If they are not, ensure that the motes are using the same radio frequency (open the Makefile of both applications and look for a line similar to "PFLAGS += -DCC2420_DEF_CHANNEL=22").
Launching the Java Application
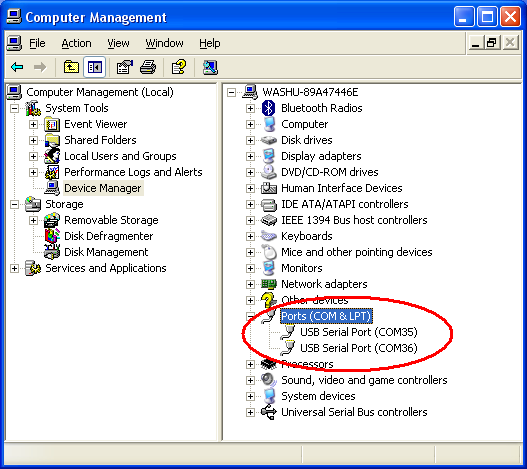
Before you can launch the Java application, you must do two things. First, you must determine what serial port the Imote2 appears as on your computer. To do this, go into Computer Management and view the list of ports as shown below. The Imote2 will appear as two ports, usually with a larger value. In this case, it appears as ports 35 and 36. One of these will work. If the first one you connect to does not work as expected, switch to the other one.
Second, modify the CLASSPATH to include /opt/tinyos-1.x/apps/OscilloscopeRF_Imote2/java. You can do this by going into System Properties > Advanced > Environment Variables > Edit User Variable for CLASSPATH.
Next, launch the Java oscilloscope application:
cd /opt/tinyos-1.x/apps/OscilloscopeRF_Imote2/java
java net.tinyos.sf.SerialForwarder -comm serial@COM35:115200 &
java oscope.oscilloscope
Replace "COM35" with the port that the Imote2 is connected to on your PC.
Note that it is important to launch the Java application from within /opt/tinyos-1.x/apps/OscilloscopeRF_Imote2/java because this directory contains a platform.properties, which tells the SerialForwarder to use the MicaZ platform, which is compatible with the Imote2.
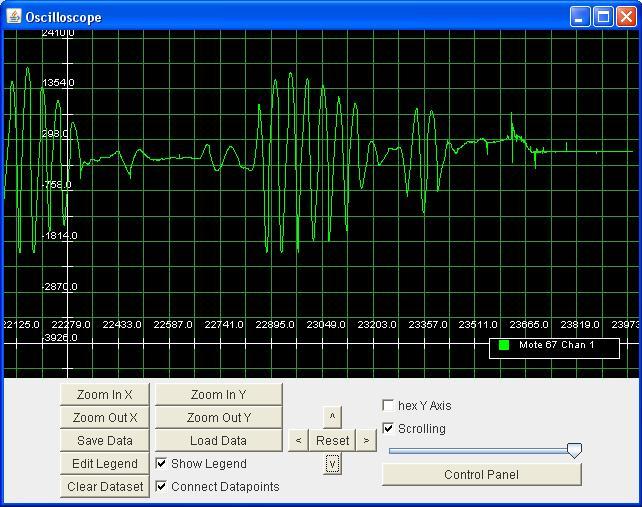
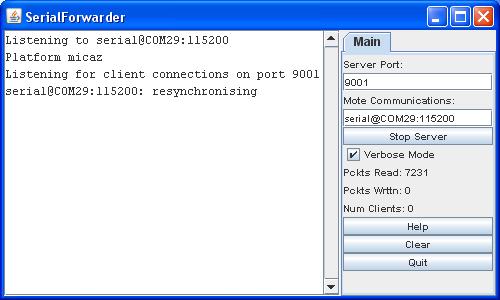
If everything works, you should see the following:


