WS2 Installation Instructions
Installing WS2 is a multi-step process that involves setting up several software tools and performing some sensor calibration. This document is designed to walk you through this process. These instructions assume that you have a PC running a recent version of Windows (Windows 2000, XP, or Vista) and know how to use a text editor like TextPad or Notepad++.
You will need to use a text editor application which supports "UNIX-style" line endings. Most text editor applications support this feature. Unfortunately, the Notepad application included with Windows does not. Notepad++ is a free alternative to Notepad which will work with this tutorial.
Contents
TinyOS Setup
Step 1
You will first need to install TinyOS 1.1 and add support for the iMote2 platform. The Structural Health Monitoring group at UIUC has created a helpful "Getting Started" guide which explains this process.
Step 2
Next, you will need to upgrade two components of TinyOS. Get the latest packages of nesC (nesc-xxx-cygwin.i386.rpm) and TinyOS-Tools (tinyos-tools-xxx-cygwin.i386.rpm) from the TinyOS Web site and download them into your Cygwin home directory. Then in a Cygwin window, run:
rpm -Uvh --ignoreos ~/nesc-xxx-cygwin.i386.rpm ~/tinyos-tools-xxx-cygwin.i386.rpm
Step 3
You will need to two edit TinyOS files. Open the file C:\tinyos\cygwin\opt\tinyos-cvs\beta\platform\imote2\.platform in a text editor. Line 12 should say:
$ENV{NESC_MACHINE} = "pointer=4,4 float=4,4 double=8,4 long_double=8,4 short=2,2 int=4,4 long=4,4 long_long=8,4 int1248_align=1,2,4,4 wchar_size_size=4,4 char_wchar_signed=false,true gcc=xscale-elf-gcc";
Remove the part that read gcc=xscale-elf-gcc from the end of this line, so that it now says:
$ENV{NESC_MACHINE} = "pointer=4,4 float=4,4 double=8,4 long_double=8,4 short=2,2 int=4,4 long=4,4 long_long=8,4 int1248_align=1,2,4,4 wchar_size_size=4,4 char_wchar_signed=false,true";
Then, open the file C:\tinyos\cygwin\opt\tinyos-cvs\contrib\imote2\tos\sensorboards\BasicSensorboard\BasicSensorboardAccelDataM.nc in a text editor. Line 20 should say:
#define SPEED 0
Change the 0 to a 1, so that it now says:
#define SPEED 1
Step 4
Finally, install the WS2 software. Download the WS2 package from this page to your Cygwin home directory. Then run:
cd $TOSROOT/apps
unzip ~/Ws2_*.zip
You can test your setup by running:
cd $TOSROOT/apps/WS2-ARQ
make imote2
If everything was installed correctly, then the last line printed after running these commands will say "dwarf2bd -nc build/imote2/main.exe".
Sensor Calibration
The frequency at which each sensorboard collects vibration samples may vary by as much as 10%. In the current version of WS2, you must manually calibrate each sensorboard by collecting its "actual" frequency ahead-of-time.
You can measure this frequency using an oscilloscope and TinyOS's TestSensorboard application.
Step 1
Attach the sensorboard to the iMote2. Orient the iMote2 so that the sensorboard is on top, as shown in the photo below. Attach the oscilloscope's probe to the pin circled on the photo below.
Step 2
Install and run the TestSensorboard application on the iMote2 as described here: Testing the Imote2 Sensor Board
Step 3
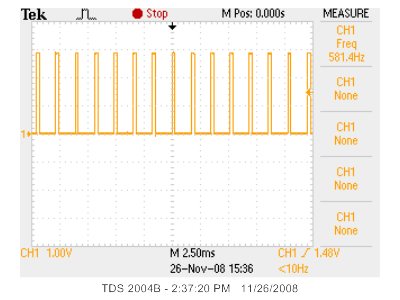
After running the StartCollection command, the iMote2 will begin collecting sensor data for about one second. Each time it samples the accelerometer, there will be a pulse on the pin that you attached the probe to, like shown below:
Use the oscilloscope to measure the frequency of this pulse. It should be approximately 560 Hz, +/- 10%. Record this measurement.
You will also want to record the ID of the iMote2 attached to the sensorboard. You can find this ID by reading the last two digits of the serial number sticker found on the bottom of the iMote2 board:
Base Station Setup
You will need to use one iMote2 to communicate wirelessly with the other iMote2s in the network. We will refer to this mote as the "base station". Install the base station code on this mote by attaching the iMote2 to your PC, and then running:
cd $TOSROOT/apps/TOSBase
make imote2
USBLoaderHost.exe -p build/imote2/main.bin.out
Sensor Node Setup
Next, you will need to install the WS2 software on the nodes that you will attach to the structure. Run the following command once:
cd $TOSROOT/apps/WS2-ARQ
make imote2
For each mote you want attached to the structure, plug it into your PC and run this command:
USBLoaderHost.exe -p build/imote2/main.bin.out
DLAC Parameters
To set up the parameters to the DLAC algorithm, open the file C:\tinyos\cygwin\opt\tinyos-cvs\apps\WS2-ARQ\java\ws2.properties in a text editor.
Each line in this file with an "=" represents one DLAC parameter. Each of these parameters has a line above it starting with a "#" that describes what the parameter means. Change the W_EH, W_AH, W_AD, and numNodes parameters to match the values computed offline.
Below this, there is a section in the file that looks like this:
# Mote addresses (base-16)
motes =          75,    46,    44
# Corresponding Measured sampling frequencies
frequencies = 598.8, 552.5, 586.5
This is where the calibration information is placed. Change the motes = line so that it lists the IDs on the bottom of each mote you calibrated. Separate each ID by a comma. Then, change the frequencies = line to list the sampling frequency that you measured during the calibration step. Again, separate each frequency by a comma.
For example, if you have a mote with the ID 45 and a sampling frequency of 545.8 Hz, and another mote with the ID 76 and a sampling frequency of 575.6 Hz, then change these lines to read:
# Mote addresses (base-16)
motes =          45,    76
# Corresponding Measured sampling frequencies
frequencies = 545.8, 575.6
Once you have completed these steps, the WS2 system is set up and ready to be deployed.
