Installing the Imote2 USB Boot Loader
The Imote2 [1] platform comes with a USB boot loader that allows you to install an application over USB. This is significantly faster and more reliable than using JTAG. The boot loader is written in C and is OS-independent. For technical details on the boot loader, see module tinyos-1.x/contrib/imote2/tools/src/ within the TinyOS 1.x CVS repository. In particular, look at files "bootloader.doc" and "bootloader_install.txt".
Contents
Checking Whether the USB Boot Loader is Installed
You can check whether the USB boot loader is installed by using USBLoaderHost to try to program an image onto the mote. If the USB Boot Loader is installed, the process should be successful. If the the USB Boot loader is not installed, USBLoaderHost will get stuck printing "Device Detected" as shown below.
$ USBLoaderHost -p build/imote2/main.bin.out
Program Mode, File name = build/imote2/main.bin.out
File Size 178204
Device detected
Device detected
Device detected
Device detected
Device detected
Device detected
Device detected
Device detected
Device detected
Device detected
Device detected
...
Follow the sections below to install the USB Boot Loader.
Installing the USB Boot Loader
The following instructions assume you are running Microsoft Windows XP, it does NOT work in Windows Vista.
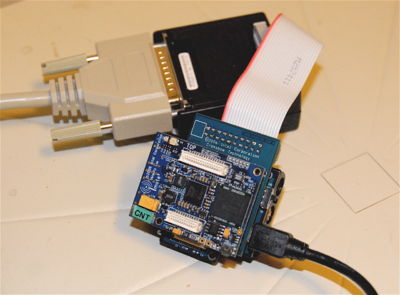
In order to install the boot loader, you must have an IIB2400 interface board [2] and a JTAG programmer. Connect the USB and JTAG cables to the interface board, then attach the interface board to the Imote2. Note that it is important to plug the USB cable into the interface board, NOT the Imote2. Connect the other end of the JTAG cable to your computer's parallel port. Ensure your parallel port is set to ECP mode at base 0x378 [3]. Here is how your hardware should look:
Crossbow Technologies provides a convenient pre-packaged script that automates the installation of the USB boot loader. You can download it here:
Download and extract the zip archive "imote2-jflashmm.zip" to a known location on your computer. Then navigate to the extracted files and run the script called "restore-bootloader.bat". Be patient! The installation process can take over 45 minutes!
Here is the output of a successful installation:
C:\Documents and Settings\Liang Fok\Desktop\imote2-jflashmm>restore-bootloader.b
at

C:\Documents and Settings\Liang Fok\Desktop\imote2-jflashmm>JFlashmm.exe bulbcx1
6 attributes.bin P 0x1E00000

JFLASH Version 5.01.007
COPYRIGHT (C) 2000 - 2003 Intel Corporation

PLATFORM SELECTION:
 Processor=             PXA27x
 Development System=    Mainstone
 Data Version=          1.00.001

PXA27x revision C5
Found flash type: 28F256L18B

Erasing block at address 1e00000
Erasing block at address 1e20000
Erasing block at address 1e40000
Erasing block at address 1e60000
Erasing block at address 1e80000
Erasing block at address 1ea0000
Erasing block at address 1ec0000
Erasing block at address 1ee0000
Starting programming
Using BUFFER programming mode...
Writing flash at hex address  1edfb00, 99.86% done
Programming done
Starting Verify
Verifying flash at hex address  1edfe04, 99.94% done
Verification successful!

C:\Documents and Settings\Liang Fok\Desktop\imote2-jflashmm>JFlashmm.exe bulbcx1
6 vector.bin P

JFLASH Version 5.01.007
COPYRIGHT (C) 2000 - 2003 Intel Corporation

PLATFORM SELECTION:
 Processor=             PXA27x
 Development System=    Mainstone
 Data Version=          1.00.001

PXA27x revision C5
Found flash type: 28F256L18B

Erasing block at address 0
Starting programming
Using BUFFER programming mode...

Programming done
Starting Verify

Verification successful!

C:\Documents and Settings\Liang Fok\Desktop\imote2-jflashmm>JFlashmm.exe bulbcx1
6 txtdata.bin  P 0x200000

JFLASH Version 5.01.007
COPYRIGHT (C) 2000 - 2003 Intel Corporation

PLATFORM SELECTION:
 Processor=             PXA27x
 Development System=    Mainstone
 Data Version=          1.00.001

PXA27x revision C5
Found flash type: 28F256L18B

Erasing block at address 200000
Starting programming
Using BUFFER programming mode...
Writing flash at hex address   21dc80, 98.81% done
Programming done
Starting Verify
Verifying flash at hex address   21de96, 99.24% done
Verification successful!
Potential Pitfall 1: Giveio Error
The installation script fails with the following error:
JFLASH Version 5.01.007
COPYRIGHT (C) 2000 - 2003 Intel Corporation

PLATFORM SELECTION:
 Processor=             PXA27x
 Development System=    Mainstone
 Data Version=          1.00.001

Couldn't access giveio device
This occurs when giveio.sys is not installed on your computer. Windows XP and other similar operating systems do not provide direct access to your computer's parallel port. giveio.sys is a service that provides direct access to the parallel port, and is needed by JFlashmm. To install giveio.sys, first install WinAVR, then run "install_giveio.bat" within C:\WinAVR\bin\.
- On Windows Vista, be sure to run install_giveio.bat as an Administrator.
Potential Pitfall 3: Failed to read device ID for this Platform
If you get the following error:
JFLASH Version 5.01.007
COPYRIGHT (C) 2000 - 2003 Intel Corporation

PLATFORM SELECTION:
 Processor=             PXA27x
 Development System=    Mainstone
 Data Version=          1.00.001

error, failed to read device ID
check cables and power
ACT: 1111 1111111111111111 11111111111 1
EXP: **** 1001001001100101 00000001001 1

failed to read device ID for this Platform
Check that the Imote2 is seated well in the IIB2400 interface board.
Potential Pitfall 3: Verify Error
Installing the attributes table fails with the following error:
$ JFlashmm.exe bulbcx16 attributes.bin P 0x1E00000
JFLASH Version 5.01.007
COPYRIGHT (C) 2000 - 2003 Intel Corporation

PLATFORM SELECTION:
 Processor=             PXA27x
 Development System=    Mainstone
 Data Version=          1.00.001

PXA27x revision C5
Failed to read the Flash ID. Retrying 4 more times...
Found flash type: 28F256L18B

Unlocking block at address 1e00000
Erasing block at address 1e00000
Unlocking block at address 1e20000
Erasing block at address 1e20000
Unlocking block at address 1e40000
Erasing block at address 1e40000
Unlocking block at address 1e60000
Erasing block at address 1e60000
Unlocking block at address 1e80000
Erasing block at address 1e80000
Unlocking block at address 1ea0000
Erasing block at address 1ea0000
Unlocking block at address 1ec0000
Erasing block at address 1ec0000
Unlocking block at address 1ee0000
Erasing block at address 1ee0000
Starting programming
Using BUFFER programming mode...
Writing flash at hex address  1edfe60, 99.95% done
Programming done
Starting Verify
verify error at address = 1e00000 exp_dat = 1 act_dat = ffff
This is a known bug with JFlashmm when it tries to write to a non-zero address (see page 9 of [4]). The work around is to completely erase the flash memory before installing the attributes table. The following command erases the flash memory:
- JFlashmm.exe bulbcx16 attributes.bin E 1E00000
Once you have erased the memory, you need to restore the Imote2's ID (if you don't its address will be 0xffff, which conflicts with TinyOS' broadcast address). The Mote's ID is its unique 16-bit integer that serves as its network address. It is usually specified on a white sticker on the mote as shown below.
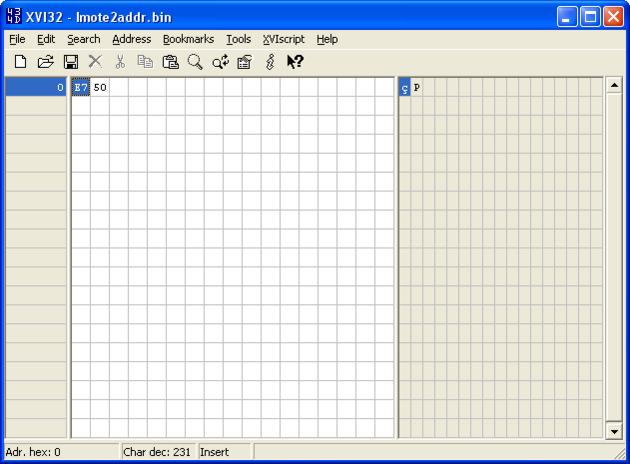
The Imote2 bove has address 0x50e7. To restore this address, you need to save the address in a binary file, and use JFlashmm to write it to memory address 0x01FE0000. Create a binary file using any hex editor. In this tutorial, we use XVI32 [5] as shown below.
Note that the address is stored in little-endian format (least significant byte has smaller address). This file is saved as "Imote2addr.bin" in the same location as where you extracted the USB Bootloader install script.
Next, open a command prompt and execute:
- JFlashmm.exe bulbcx16 Imote2addr.bin P 1FE0000
You should see the following output:
JFLASH Version 5.01.007
COPYRIGHT (C) 2000 - 2003 Intel Corporation

PLATFORM SELECTION:
 Processor=             PXA27x
 Development System=    Mainstone
 Data Version=          1.00.001

PXA27x revision C5
Found flash type: 28F256L18B

Erasing block at address 1fe0000
Starting programming
Using BUFFER programming mode...

Programming done
Starting Verify

Verification successful!
To test the installation, disconnect the USB cable and Imote2 from the interface board and attach the USB cable directly to the Imote2. The install the TestSensorboard application as described here Testing the Imote2 Sensor Board. Use the ImoteConsole to connect to the Imote2 and type "NodeID" to view the node's serial number.
Potential Pitfall 4: Erase Timeout
Erasing the entire flash memory fails with the following error:
$ JFlashmm.exe bulbcx16 attributes.bin E

JFLASH Version 5.01.007
COPYRIGHT (C) 2000 - 2003 Intel Corporation

PLATFORM SELECTION:
 Processor=             PXA27x
 Development System=    Mainstone
 Data Version=          1.00.001

PXA27x revision C5
Found flash type: 28F256L18B

About to erase the entire flash memory.....
Is this what you want to do? (Y or N)
yErasing block at address 0
Error, Block erase timed out
This is because the memory block at address 0 is write-protected [6]. JFlash should automatically unlock the block before trying to erase it. In a correct execution, JFlashmm should print "Unlocking block at address XXXXXX" before the "Erasing block at address XXXXXX".
Solution: This problem may be caused by the battery pack being attached to the debug board. Try removing the battery pack and repeating the erase command.

